
# 简介
公司经常有一些网站需要发布上线,对比了几款不同的产品后,决定使用阿里云的函数计算来托管构建出来的静态网站。 FC 弹性实例自带的 500 Mb 存储空间 (opens new window)对静态网站来说简直太充足了 😂。
# 部署静态网站到 Custom Runtime 函数
假设我们现在有如下结构的前端工程:
/
├ dist/ 待部署的构建产物
│  └ index.html
├ src/
└ package.json
# 1. 编写一个简单的 HTTP 服务器
以 Express 为例, 首先添加依赖到工程:
yarn add express
然后新建 app.js 并写入:
let Express = require("express");
let app = new Express();

// 使用 dist 文件夹中的内容对外提供静态文件访问
app.use(Express.static('dist'));

// 重定向无法处理的请求到网站的根目录
app.use((req, res) => {
    res.redirect("/");
});

// 监听 FC custom 运行时默认的 9000 端口
let port = 9000;
app.listen(port, () => {
    console.log(`App started on port ${port}`);
});
通过 node app.js 启动这个简单的 Express 服务器, 并访问 http://localhost:9000 确认 /dist/index.html 能被访问到.
接下来就是把 app.js 和 dist 一起发布到函数计算上就行了.
# 2. 编写 bootstrap
函数计算 custom 运行时要求用户提供一个 bootstrap 文件用于启动自定义的 HTTP 服务器, 所以我们需要在根目录下创建这个文件:
#! /bin/bash
node app.js
注意第一行的 #! /bin/bash 是必须的, 不然函数计算不知道该用哪一个解释器来执行脚本中的内容.
Windows 用户记得把这个文件的换行符从 /r/n 改成 /n , 不然会遇到函数计算启动超时的问题.
# 3. 安装 @serverless-devs/s 并编写 s.yaml
添加 @serverless-devs/s 命令行工具到工程:
yarn add @serverless-devs/s -D
然后在根目录下创建一个基础的 s.yaml 配置文件:
# https://github.com/devsapp/fc/blob/main/docs/zh/yaml/
edition: 1.0.0
name: my-awesome-website-project
services:
  my-service: # 任意的名称
    # 使用 fc 组件
    component: devsapp/fc
    props:
      # 部署到任意的可用区, 例如深圳.
      region: cn-shenzhen
      service:
        # 深圳可用区的 my-awesome-websites 服务
        name: my-awesome-websites
      function:
        # my-awesome-websites 服务下的一个函数
        name: www-example-com
        # 使用 custom 运行环境
        runtime: custom
        # 由于使用了 custom 运行环境, 所以这里可以随便填
        handler: dummy-handler
        # 部署当前文件夹下的全部内容
        codeUri: ./
      triggers:
        - name: http
          # 创建一个 HTTP 类型的触发器, 以便客户端可以通过 HTTP 协议进行访问
          type: http
          config:
            # 允许匿名访问
            authType: anonymous
            # 静态网站只需要处理 HEAD 和 GET 请求就够了
            methods: [ HEAD, GET ]
# 4. 部署到函数计算
配置好 AccessKey 和 AccessSecret 后 (opens new window), 执行命令:
s deploy
🎉 你的网站就部署上去了.
接下来就是配置自定义域名了, 配置好以后就可以通过你自己的域名访问到这个网站了.
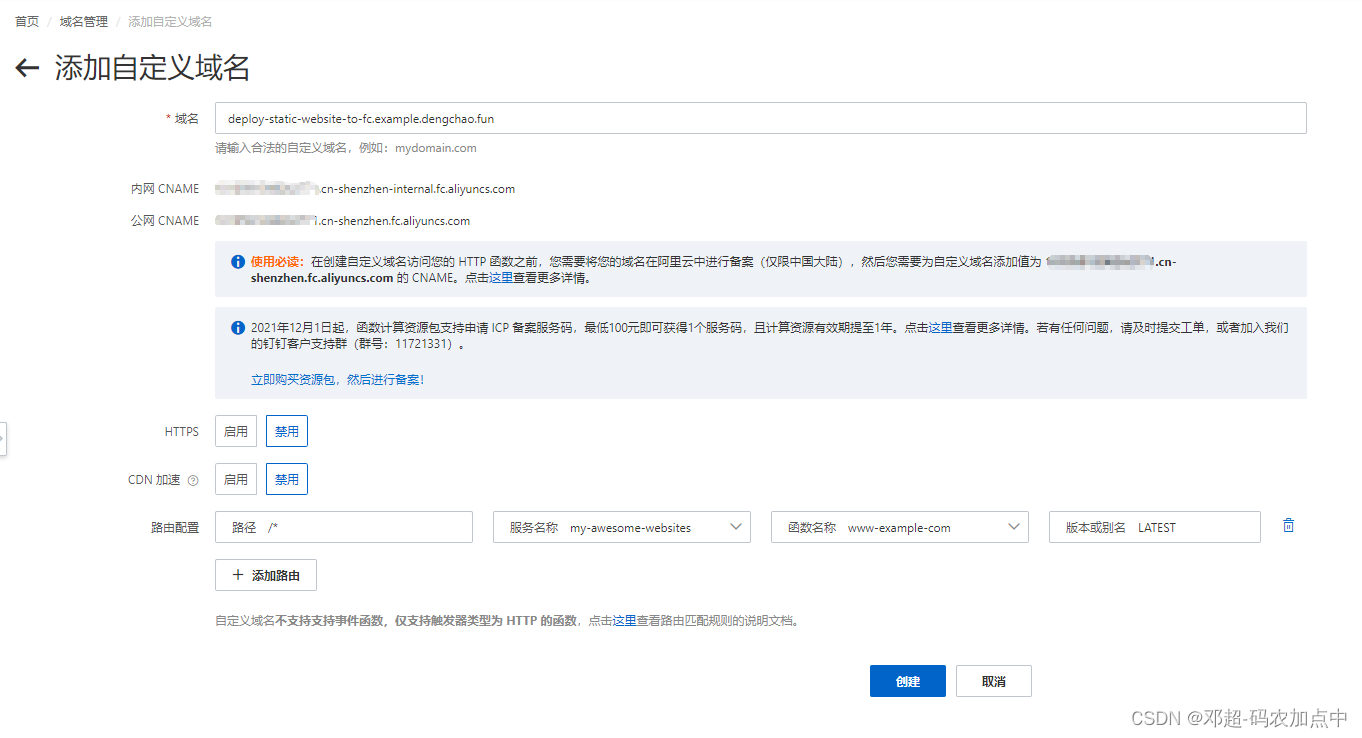
# 5. 配置自定义域名
以自定义域名 deploy-static-website-to-fc.example.dengchao.fun 为例.
首先添加 CNAME 记录, 解析值填写 ${UID}.${REGION}.fc.aliyuncs.com. 因为我们的 s.yaml 中设置的 region 是 cn-shenzhen,
所以对应的值就是 xxxxxx.cn-shenzhen.fc.aliyuncs.com .
 接下来设置函数计算控制台上的自定义域名:
 🎉
访问一下试试看: http://deploy-static-website-to-fc.example.dengchao.fun (opens new window)
🎉
访问一下试试看: http://deploy-static-website-to-fc.example.dengchao.fun (opens new window)
# 样本工程
本文中的样本工程已经上传到 GitHub: https://github.com/DevDengChao/deploy-static-website-to-fc-example (opens new window)
# 参考
- [Aliyun] [FC] [CDN] 如何使用 CDN 对部署在函数计算上的静态网站进行缓存
- 阿里云函数计算-产品简介 (opens new window)
- Serverless devs 官网 (opens new window)
# 推广
欢迎大家领取 阿里云优惠券 (opens new window), 新购续费更优惠, 更有最高 10 %
返现,详询 钉钉 (opens new window):
 (opens new window)